Wednesday, February 22, 2017

2/22/17 3D Design


Today's Class- Today the topic was planes, as in surfaces of 3D art.  We looked at some examples of Frank Lloyd Wright houses and Richard Serra sculptures, two artists who used broad planes in their work.  Then we moved on to a portfolio exercise on this topic.  

Automobiles can be considered our most potent consumer durable good, and probably the most heavily advertised thing as well.  They have inspired art for more than a century.  Tonight we considered external appearances, and students were asked to build a model of a favorite car, one chosen just because they liked the appearance, and not based on cost, speed, reliability, etc.  Instructions were to build it using foam core and bristol board, and each time a piece was cut out to be included in the car, an identical piece was to be cut out and set aside.  After your model of the car is completed and assembled, take the second set of pieces and turn the into something else- can be a recognizable object or abstract, anything but a car.  Below are some student examples from previous semesters.


And here are examples from tonight's class-


How to make this up- Everyone was present and completed the assignment

Homework- The positive/negative space graded project (skeletons) is due March 1, 2017.  

For next class 3/1/17- We will start our next graded project, the stone age art project.   Art of that era was made from natural materials, as there was nothing else.  Often the shapes of the materials dictated the subject.  I will be providing some seashells and pieces of bamboo.  You need to bring some natural materials of your choosing, such as natural wood (no plywoods), stones, seeds, etc.  Pieces of living plants (such as leaves and flower petals) are permitted, but they will start to wilt almost immediately, so should be added just before it's turned in.  You will need glue to attach everything together- hot glue is recommended for this project.  And because the cave based artists of long ago somethings painted their creations, you have that option as well.  Below are some examples from previous semesters


The subjects should reflect the kinds of subjects used by artists of the cave dwelling era- so humans, animals, mythological human/animal hybrids, all of which can be whole or parts of such things.  

Wednesday, February 15, 2017

2/15/17 3D Design


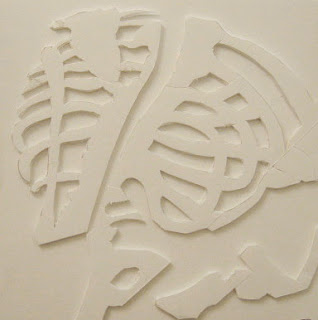
Today's Class-  We opened tonight by looking at the completed Make 100 projects. After the critique these were graded and returned to the students before the end of the class.  Then we moved on to the second project of the semester, an exploration of the the use of positive and negative space, using relief sculpture and starting with skeletons as the subject.


How to make this up- Everyone was present tonight, so should know what to do.  But in case some reminders are needed before it's due, everyone started with a drawn skeleton (human or animal) and reproduced all or part of it as relief sculpture, using foam core as the material.  Below is a sample I produced a few years ago to explain the project, first a human skeleton, then a second relief piece that borrows structures, movements, and similar relationships of positive and negative space.


Below are some student examples from previous semesters of this project.


Homework- The completed positive/negative space relief project is due at the beginning of class on 3/1/17.


For next class 2/22/17- We will do a portfolio exercise that addresses the principle of planes, broad surfaces of a sculpture.  The starting point will be cars.  Bring photos (all sides) of your favorite car based only that car's appearance, not because of any other characteristics.  You will construct a model of that car using bristol board and foam core, and then a second piece of three dimensional art that isn't a car.  Bring bristol board, scraps of foam core, pencil and eraser, x-acto knife, and glue.  You may leave the slime at home.

Wednesday, February 8, 2017

2/8/17 3D Design


Today's Class- Today we discussed the ideas if symmetry and balance as part of composition.  I showed art from various points in history, and we decided if each was symmetrical or not.  Then we began the new portfolio exercise- starting with simple memory sketches of symmetrical objects, then choosing one to build a three dimensional composition around, with the rule that the final piece would not itself be symmetrical.

How to make this up- Everyone was present tonight so everyone has it done.  Here's an example from tonight's class-


Homework-  The first graded project- the Make 100 module project- is due at the beginning of class on February 15, 2017.  


For next class 2/15/17- After a critique of the first project we will discuss the concept of negative space in sculpture and then start our second graded project.  Below are some student examples from previous semesters.


The idea is to start with an image of a skeleton, human or animal, whole or part, and produce it as a relief sculpture, which will emphasize the positive (bones) and negative (space between bones) relationship.  After completing that, the second part of the project is to create a second piece that is not a skeleton, but shares some positive and negative relationships with the first one.  


Each piece will be created on a 12" x 12" base of foam core, and the positive shapes will also be made from foam core.  You may use all white for both parts, or have the option of choosing a color for either the positive or negative shapes.  Bring enough foam core to create two 12" x 12" relief pieces (base and raised pieces), x-acto knife, glue, and pencils.

Wednesday, February 1, 2017

2/1/17- 3D Design


Today's Class- Today we had our first real class of the semester.  It was a very small class, but we had it.  At the beginning of the semester the focus is on principles of design, formal issues, etc.  We opened with a classic beginning 3D project, called "Make 100", creating identical modules and building them into a larger piece.

How to make this up- The first step is to create a small three dimensional module using bristol board. The resulting piece should be three dimensional, with at least one side 1.5 inches, but the whole thing no larger than 1.5 inches in any direction.  I recommend using sketchbook paper to work out possible ideas, then a prototype in bristol board.  The module should be stable, maintaining its shape at all times.  It can be made from a single piece that has some folds in it, or from multiple pieces attached to each other.


If you are satisfied with your module concept, you need to make 100 identical copies.  I suggest a bristol board pattern, then trace the shape on other pieces of bristol, then cut them out, then glue them together to make the modules.  The next part of the project is to take those 100 modules and assemble them into a larger sculpture.  They should be glued together into a permanent design.  Below are several student examples from previous semesters.


In creating the assembled sculpture, keep in mind that the pieces will be viewed from multiple angles.  Account for both positive and negative space.  The final piece can be made to resemble a recognizable object, or can be abstract design.  Consider all the different ways that you can join them together.  You have the option to create a flat base to attach everything to (see top example) or just build something that can be a free standing sculpture.

Homework- The assembled Make 100 module project is due at the beginning of class on February 15, 2017.

For next class 2/8/17-  More formal issues and bristol board.  You will need a stiff material for a base, such as foam core or mat board, about 8"x10".  You will also need a sketchbook and pencil, scissors, and white glue.  We will be doing a portfolio exercise with a focus on balance and symmetry.