Thursday, September 30, 2010

9/30/10 2D Design

Today's Class- Tonight we opened with a group critique of the stipple (dot) drawings, which were also graded and returned to the class. Then we did a new graded project, our line drawing final, involving a drawing of a complex potted plant, as in the example above.

How to make this up- Further student examples and detailed instructions as to how to complete this project can be found here.

Homework- Anyone who has not yet turned in either of the graded projects should try to get them completed as soon as possible. The more weeks it takes for work to be turned in, the fewer points it is worth.

For next class 10/7/10- We will discuss the concept of value and do a portfolio exercise in value drawing. Bring your 18" x 24" pad, charcoal or black conte crayon, and appropriate erasers.

Saturday, September 25, 2010

9/25/10 Art History I

Today's Class- Today we covered two chapters in the book, two early civilizations of the ancient world. The Near/Middle East developed the first cities in the western world, supported by widespread agriculture and trade. At the same time, Egypt developed its own complex civilization, a series of dynasties spanning about 3000 years. In both regions there are examples of massive building projects.

Important terms- canon of proportion, ceramics, encaustic, hieratic scale, hypostyle hall, lost wax casting, mastaba, pylon, register, relief sculpture, seals, stele, votive figure

Important artworks- Catalhoyuk, Votive Figures (Mesopotamia), Uruk Vase, Nanna Ziggurat, Votive Statue of Gudea, Ceremonial Complex at Persepolis, Palette of Narmer, Funerary Complex of Djoser, Great Pyramids, Menkaure and a Queen, Seated Scribe, Temple of Amun at Karnak, Temple of Rameses II, Mummy Wrapping of a Young Boy

Homework- Everyone should have a new current arts article with summary/reaction statement for next week's class.

For next class 10/2/10- We will cover the art of the ancient Aegean civilizations, and start our study of Ancient Greece. Bring a notebook and Book 1- Ancient Art. I suggest you read chapters 4 and 5 in your textbook to familiarize yourself with the material.

Friday, September 24, 2010

Basic Drawing- Gesture/Reductive/Negative Space


Basic Drawing Exercises- Gesture, Reductive, and Negative Space

Today we did a series of portfolio exercises designed to encourage students to think about the subjects being drawn in different ways. All are useful concepts that can be used to improve one's drawings in general and should always be considered while drawing.

The assignments-

Gesture and Reductive- The first thing we did today was an exercise in gestural and reductive drawing. A large potted plant (or a collection of branches) was set up in the middle of the room and students were asked to make a series of line drawings of it, using a progressively smaller number of lines. In doing so, students were required to consider which lines were the most important in describing the plant. To make this up use your pencil to divide your sheet of 18"x 24" paper into 8 equal size boxes. Then find a large plant with long stalks (or collect several long branches from trees or shrubs in a container that holds them upright) to draw from. Using pencil, draw the plant in each box using the following number of lines: 24, 20, 16, 12, 8, 4, 2, 1. Below is a student example from a previous semester.


Since the number of lines you may use for each will be limited, for each drawing show only the most essential lines needed to understand the nature of the plant. Note in each box the number of lines used.

Negative Space- Last week we drew contour lines surrounding shoes, creating positive shapes. In art, the space not contained in a positive shape is called negative space. Since everything in a drawing is either positive or negative, both are equally important in the drawing.


I brought in my old studio chair, and set it up on the center table, and had students draw the all the empty spaces in the chair, anything surrounded by wood. By drawing all the negative spaces and locating them in the proper relative space, the original object is revealed, as in the example below.

To make this up, if you have a chair with a lot of spaces within, you can do the same thing. If not, a complex section of bare branches of a tree or shrub works very well. Draw it large so it fills a whole sheet of your 18" x 24" paper.

Positive and Negative Shapes- The last exercise brought together positive and negative. I set up a several bottles on the central table, and had the students do a line drawing of them. They drew the positive shapes of the bottles, but were encouraged to use the negative shapes between them to help find the exact contours of the bottles, and the relative spacing and position of each. An example is shown below.

You can make this up by setting up a group of six large bottles and drawing them on your 18"x 24" paper.

Homework- Set up a group of 4 similar sized bottles. (all large wine bottles, all mediums sized soda/water bottles, all small perfume bottles, etc) You will do 4 drawings of the set up, one per page in your small sketchbook. The bottles should remain in the same relative positions to each other, but each drawing should have a different viewpoint. So either have the bottles on something that can be rotated, or move yourself around the set up to a different spot for each sketch.


Thursday, September 23, 2010

9/23/10 2D Design

Today's Class- Tonight we looked at slides of art from cave paintings to the present, discussing how line was used in each. Then the students did a series of exercises involving line drawings of shoes, as in the example above.

How to make this up- Tonight's exercises are identical to what I did with my Basic Drawing class last week, so scroll down to 9/17/10, use the link in the blog archives to the right, or just click here, and then follow the instructions in the "How to make this up" section of the post.

Homework- The dot drawings that we started in class last week are due at the beginning of class on September 30, 2010. You must turn in the original source photo with your stipple drawing.

For next class 9/30/10- We will open with a class critique of the stipple drawings, then do our second graded project, a line still life. In addition to the homework, bring your 18" x 24" pad of drawing paper, pencils, and eraser. I'll provide the subject of the drawing.

Saturday, September 18, 2010

9/18/10 Art History I

Today's Class- Today the art history research assignment was distributed and reviewed. We then discussed a few of the articles that students brought in, and we covered the first chapter in the textbook, prehistoric art in Europe.

Important Artworks- Hall of Bulls, Woman from Willendorf, Lepenski Vir House/Shrine, Stonehenge

Important Terms- adobe, capstone, composite pose, corbeled vault, dolmen, kiln, megalith, modeling, mortise-and-tenon, post-and-lintel, wattle and daub

Homework- The research assignment given today is due at the beginning of class on October 30, 2010. Those who do not yet have an assigned topic can contact me by e-mail or deal with it in class next week.
All students should have a new current events arts article and summary/reaction for next week.

For next class 9/25/10- Next week we will look at the ancient art of the Near and Middle East, and start to look at Ancient Egypt. Bring a notebook and book 1- Ancient Art. I recommend reading chapters 2 and 3 of your textbook to prepare.


Friday, September 17, 2010

9/17/10 Basic Drawing


Today's Class- Today we started our study of line. We viewed some slides showing how line has been used in art from prehistoric times to the present. Then the class did some exercises in contour line drawing, with shoes as the subject.

How to make this up- Find a shoe, something with a full upper portion (not a sandal/flip flop). You will do the following drawings from your shoe using pencil line:

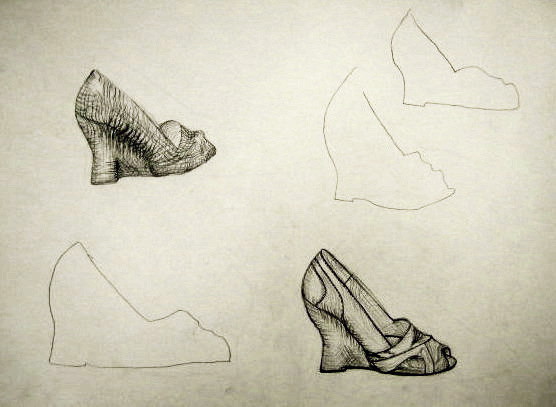
Exterior Contour- A single line that surrounds and describes the silhouette of the shoe. No interior structures should be shown. Four examples can be seen in the above photo, and in the bottom left of the photo below. Pay attention to shoe proportions (height to length, relative locations of details) and to the edge. We spent 30 minutes on this exercise, with students drawing between 1 and 6 shoes.

Cross Contour- The artist draws perceived lines that represent the volume of the shoe and movement over its surface. The lines provide clues as to the true 3 dimensional shape of the shoe. Use lines in multiple directions, and they may intersect with each other. There is one example in the above photo, and in the upper left of the photo below. Students spent 30 minutes drawing one shoe in cross contour.

Blind Contour- The shoe is drawn, looking only at the shoe, not at the paper. Let your eye follow a path around the exterior contour of the shoe, paying close attention to details of the edge, moving your pencil to match. See the upper right of the photo below for examples. The slower you draw, the better the result will be. Students spent 15 minutes on this exercise, drawing anywhere from 4 to 12 shoes.

Final Shoe- The last exercise was to draw one fully rendered shoe, including all details of structure and surface. Use cross contour to whatever extent you want. Line only, no shading. An example can be seen in the lower right of the photo below. Students spent 30 minutes drawing the one shoe.

This is a portfolio exercise, which must be made up by the midterm portfolio collection- 10/29/10.

Clockwise from bottom left- exterior
contour, cross contour, blind contour,
fully rendered final shoe


Homework- In your small sketchbook, draw ten line drawings of shoes, one per page. Include the following:

8 pages of exterior contour drawings (just the silhouette)
1 page cross contour drawing
1 page fully rendered shoe

Use whichever pencil(s) you want. Line only, no shading. You may use the same shoe that you did in class, a different shoe, or ten different shoes if you prefer.

For next class 9/24/10- Bring your 18" x 24" drawing pad, pencils, eraser, and sketchbook. I'll provide the subjects for more line related exercises.

Thursday, September 16, 2010

2D Design Stipple Drawing


The stipple drawing graded project begins with a black and white photograph of your choosing. It must be a photograph of something real, not line art, computer graphics, etc. Ideally the photo should include a wide range of values, from light to dark and various gray tones in between. It can be an actual photographic print, or something you find in a magazine, book, etc. You'll be making a drawing based on the photo, so choose something you feel comfortable drawing. I made the example above, the three below are student projects from earlier semesters. (Click on the photos to enlarge them)


On a piece of paper draw a box 6"x 6" in pencil. Choose a square portion of your photograph to reproduce inside that box. You can draw it at exactly the same size, or choose a smaller square and enlarge it to fill the 6 square inch box. (in all three examples above, the smaller image is the original photo, the large image is the resulting dot drawing) Draw the composition from the photo in pencil inside the box. Then use your ultra fine point marker to match the values from the photo in your drawing, using nothing but dots.

The main focus in grading these will be how well you match the exact values of the original photo. Your ability to exactly copy the composition of the photo is not as important, but it will be very difficult to match the various value shapes within the composition if your drawing is not faithful to the original. I'll also be looking for consistency in your choice of values. You may not use line or switch to a larger marker to fill in broad areas of black, just the same tiny dots. It must meet the minimum 6 square inch size, but may be bigger if you want your drawing to be of a different proportion.


Saturday, September 11, 2010

9/11/10 Art History I

Today's Class- Today the syllabus was distributed and reviewed. Students filled out a survey about their art and art history experiences, which was discussed with the group. After that we had a discussion of some art related issues, based on slide viewing of works from the history of art.

Homework- The first current art events article for your journals is due next Saturday, 9/18/10. I recommend that students read Chapter 1 in their textbooks to prepare for next week.

For next class 9/18/10- Bring Book 1 (Ancient Art), and a notebook, and we will take a look at the art of Prehistoric Europe.

Friday, September 10, 2010

9/10/10 Basic Drawing

Today's class- During today's class the syllabus was distributed and reviewed. Students filled out a survey about their artistic experiences and we discussed them as a group.

Homework- None

For next class 9/17/10- Bring your 18"x 24" pad of drawing paper, pencils, and eraser. The subject for next week's exercise will be shoes and you are responsible for bringing one to draw. So either have an extra shoe or be prepared to remove one from your foot.

Thursday, September 9, 2010

9/9/10 2D Design

Today's Class- Tonight was the first day of the semester. The syllabus was distributed and reviewed. Students filled out a survey about their artistic experiences, which was discussed by the whole class.

Homework- None

For next class 9/16/10- Students should bring their 18" x 24" pad of drawing paper, pencil and eraser, and ultra fine and large black markers. Students should also bring a black and white photograph to base a drawing on. I will have some published material for students to pick through if they don't have a photo to work from.

For more information about the Surf Art Show in Belmar, visit the BAC website.

Welcome to the Fall 2010 Semester

This is the blog that I have set up for all my classes at Ocean County College. To make things easier to follow, posts for my Art History I class (ARTS 181-W1) will be in red text, posts for my Basic Drawing class (ARTS 183-05) will be in green text, while posts for my 2D Design class (ARTS 184-E01) will be made using blue text. Posts that may be of interest to all my classes, such as this one, will be written with black text.

I will use the blog each week to post information about my various classes. I will include a description of what was covered, and any assigned homework. For the studio classes I will show photos of finished student work when applicable and available, and provide detailed instructions as to how to make up the projects, as well as due dates and materials needed for the following class. For my art history class, I will include the chapter(s) covered, important works, vocabularies, and themes.

The title of each post will include the date and the name of the class. About a month's worth of postings will appear on the main page, but earlier posts will be available through the blog archives. This blog is no substitute for the class itself, but it allows a student who misses a class to catch up quicker. And for those students who never miss class, it may still be worth stopping by to see more examples of finished projects, or to get a reminder of when things are due, or what is needed for the next class. It is available 24/7, and most of what you will need to know is there without requiring a reply from me. If you need further explanation or have other questions, you are free to e-mail me and I'll get back to you within a day most times.