Showing posts with label Basic Drawing. Show all posts

Friday, December 17, 2010

12/17/10 Basic Drawing and 2D Design

Today's Class- Today was the last meeting of the semester for the Basic Drawing Class and the emergency grading day for my 2D Design class.

2D Design- All the work that had been left in the classroom last night was graded, along with whatever new work came in today. Several students came by to pick up the graded work. What was not picked up was put on one of the horizontal shelves just to the left of the door in the above photo. 2D work is on the top shelf, labeled with the class and my name. A small slip of paper is tucked inside the cover of each pad or some equivalent, with the grades for the Final Project, and the semester portfolio, along with a tally of absences and times late for class. I also graded any back projects submitted today, and returned all the student work I had in my possession. If you come to pick up your work before the end of the fall classes, go see the art department secretary across the hall to fill out the student evaluation form for our class, since we didn't get to do them last night.

Tomorrow morning (Saturday, December 18th) I will be on campus one last time this semester, in the TV Studio building, available to receive and grade work from the 2D class. If you still wish to get credit for work done for the class, bring it to me in that building's main lecture hall (right by the front door) between 8:30 and 10 am.

Basic Drawing- We held a critique of the Final Drawings, then the class was dismissed while I graded those drawings, the 2nd half portfolios, and the sketchbooks. Most students from the class returned to pick up their graded work. Unclaimed work was put on one of the horizontal shelves just to the left of the door in the above photo. Basic Drawing work (large pads and sketchbooks) are located on the bottom shelf, which is labeled with my name, the class, day, and time. A small slip of paper is tucked inside the front cover of each pad, with the grades for the Final Drawing, the portfolio, and the sketchbook, along with a tally of absences and times late for class.

I can't make an guarantees about the security of work on those shelves. Sometimes it sits for years, sometimes someone decides to throw it all away. If you are concerned with getting your work back, I suggest that you pick it up before the end of the semester.

Class grades will be worked out over the weekend and posted to WebAdvisor shortly after that.

Enjoy the break.

Friday, December 10, 2010

12/10/10 Basic Drawing

Today's Class- Today the class did the final drawing of the semester. A typical still life was set up, and each student chose from among charcoal, ink, or conte crayon to draw it. Other than a few minutes spent filling out the end of the semester evaluation forms, students were given the entire period to complete the drawings, which were collected at the end of the class period.

How to make this up- Everyone still in the class showed up today, so no one needs to make it up.

Homework- No new homework this week. If you're caught up with all the sketchbook assignments you can relax. If not, you have a week to make them up. Look back through this blog for week by week assignments.

*******Second Half Portfolio********

The 2nd Half Portfolio will be graded next week during the class period. Complete portfolios should include the following 6 drawings:

Nov 5 Ink Wash from still life (2)
Nov 19 Conte Crayon still life (one black, one red)
Dec 3 Conte Crayon mannequins (2 red and black)

For next class 12/17/10- Final grading day. We will start with a group critique of today's drawings, and I'll be grading the 2nd half portfolios and sketchbooks, with all to be returned by the end of the class. Make sure you bring all the portfolio drawings and your sketchbooks, or you won't receive a grade for them.

Friday, December 3, 2010

Basic Drawing- Chiaroscuro Crayons

Today's Class- Today we continued our exploration of value with conte crayons, but with a difference. I started by showing a few slides of Renaissance era chiaroscuro drawings and prints, and then introduced a variation that we could do with the materials at hand- white paper and red and black crayons. The class did value drawings using both crayons together, with the white of the paper as the lights in the composition, the red used for middle value tones, and black used to deepen the shadows where appropriate. Above (drapery) and below (a hand) are student examples from previous semesters.


The Assignment- For today's subject, I put some of the various mannequin parts in the center of the room and had students do two drawings of one of the mannequins, using both red and black conte crayons. To make up this work you will need a figural subject- a full sized mannequin or statue, an actual person (dressed is acceptable), or a statuette/figurine large enough to see surface details. (to avoid the complications of faces, draw the subject from the neck down) Shine light on the subject to create patterns of light and shadow and do the following drawings-

Traditional Style- Essentially a red conte crayon value drawing to which black crayon is added to deepen shadows. Draw your subject on your 18" x 24" paper using the red crayon first, all the light and medium values. Then to achieve darker values, gradually blend black into the red, making it as dark as it needs to be to match the values in your subject. Spend about an hour on the drawing. Below is an example from a previous semester.


For the second drawing, view your figure from a different position (in class I rotated the mannequins) and draw again using the black and red conte crayons, spending about 90 minutes on it. 

Hard Edged Style- If you want, you can try this variation for the second mannequin drawing. For this alternative style of drawing, every value in the subject is broken down into 3 simple tones- solid white, solid red, solid black. The resulting drawing is nothing but solid shapes, no gradually shaded values. To try this type, decide in advance what range of value gets assigned to which of the three tones, and apply that consistently throughout the drawing. Below is an example from a previous semester.


These drawings are portfolio exercises, and must be made up by the last class meeting of the semester to receive credit.


Friday, November 19, 2010

Basic Drawing-Conte Crayon


The Assignment- Set up a still life. Put a small box on a table, drape with a white or light colored cloth, and arrange one white and two darker colored objects on and around the draped box. Shine a direct light on the set up to create strong light and shadow patterns. Then do the following:

Black Crayon- Draw the still life using the black crayon on a sheet of your 18" x 24" paper. As with a charcoal drawing, use the crayon to draw the objects and drapery, paying attention to shapes, relative sizes, and relative positions of the objects, as well as matching the values (local color and light/shadow effects) as closely as possible. The finished drawing should eliminate contour lines in favor of edges of value shapes. Spend about 90 minutes on the drawing.

Red Crayon- Rearrange the objects and draw the still life again on a new sheet of 18"x 24" paper, using the reddish (or brown) conte crayon. Do not use pencil first, as the graphite won't look good under the red crayon. All of the above still applies, but because your darkest marks will not be as dark as can be achieved with the black conte crayon, you may have to adjust relative values of everything in the drawing. Above is a student example from a previous semester. Again, spend about 90 minutes on it.

These are portfolio exercises, that must be made up by the last day of the semester to receive credit.


Friday, November 12, 2010

Basic Drawing-Ink Wash Final


Today's Class- Today the class did the final ink wash drawing of the semester, a graded project. The subject was a potted plant with long vines and leaves, hanging within a wooden tripod, in full light. Students were asked to do an ink wash drawing at 100% scale, matching shapes and values of everything within the view. Student examples from previous semesters are shown above and below.

How to make this up- Put a medium-large (about a foot in diameter) potted leafy plant on a wooden chair in a well lit room. Draw it at 100% scale (if a leaf is 2 inches on the plant, it should be 2 inches on the paper), with the flower pot centered in the drawing. You may sketch it with pencil first before using the ink wash. Match values as closely as possible, both local color values and light and shadow if any exist. As with all value drawings, the resulting drawing should eliminate lines in favor of value shapes. Spend up to 3 hours working on the drawing.


Friday, November 5, 2010

Basic Drawing-Ink Wash Drawing


The Assignment- Find a white or light colored cloth, and hang it on something tall so that the drape hangs down like a backdrop. Place two white or light colored objects on a table in front of the drape, and shine a direct light to create strong patterns of light and shadow. Draw on a sheet of your 18" x 24" paper, using light pencil contour lines to sketch out the basic shapes of objects and cloth, then using the ink wash to draw in the value. Ink wash is made by putting a few drops of ink in a small water container (like a paper cup). Test the strength of the wash on scrap paper or a corner of your page- add water to lighten it, add ink to darken it. The typical way to make an ink wash drawing is to start filling in the lightest values first (everything not white) and then gradually darken parts of the drawing by gradually adding more drops of ink to the wash. You may want to let the paper dry a little between washes. An example of how values can be built in successive washes can be found here.

Do two such drawings, rearranging the two objects between drawings. Spend about 90 minutes on each. As with other value drawings, try to eliminate lines in favor of shapes, and try to match values from the set up as closely as possible. After the drawings are completely dry, you may erase any visible pencil lines. The above student drawings include some non-white objects, but they are still good examples of how a resulting drawing can look.


Friday, October 29, 2010

10/29/10 Basic Drawing


Today's Class- Today was our final day of value drawing with charcoal, so students devoted the entire class to producing one still life drawing using either vine or compressed charcoal. A few examples from today's class are shown above. These drawings will be returned graded next week. While students were drawing, 1st half portfolios were graded and returned to students.

How to make this up- Put two boxes on table and drape with a white or light colored cloth. Arrange two white and two solidly colored objects of similar size on and around the boxes, and shine a direct light to create patterns of light and shadow. Draw the still life set up with vine or compressed charcoal on a sheet of 18" x 24" paper, paying attention to the shapes, and relative sizes and positions of objects, as well as matching values of light and local color of objects as closely as possible. Spend up to 3 hours on the drawing.

If your portfolio was not graded today, bring it in as soon as possible. The more weeks it is late, the more points will be deducted.

Homework- Find a pumpkin. It can be whole or carved as a jack o'lantern. Draw 3 views of it, one per page. Do full value renderings, accounting for light and shadow and local color of various parts (pumpkin vs. stem, or if carved, account for dark or lit values inside) using pencil.

For next class 11/5/10- We will begin our study of value using ink wash. Bring your 18"x 24" pad, black waterproof drawing ink, watercolor brushes, pencil and eraser, and a few water containers (cups, cans, etc).

Friday, October 22, 2010

Basic Drawing-Mixed Value Exercises


The Assignment- Put a box on a table, drape with two cloths- one white, one a darker solid color. Find 2 white and 2 solidly colored objects of similar size and arrange on and around the box. Shine a direct light to create patterns of light and shadow. Then do the following drawings, paying attention to shapes, sizes, proportion, and spacing of your objects:

Vine Charcoal- Do not fill in the page, like we did last week- just draw with the vine charcoal on the white page, a standard value drawing, matching light and shadow as best as you can. Spend about 1 hour on the drawing and spray with fixative when it's finished.

Compressed Charcoal- Rearrange the 4 objects, then do a full value drawing using the compressed charcoal. Spend about 90 minutes on it.

These are portfolio exercises and must be made up by the 1st Half Portfolio collection to receive full credit.

Friday, October 15, 2010

Basic Drawing- Simple Value Exercises


The Assignment: We did two exercises, using two different kinds of charcoal. Set up a still life grouping: put a box on a table, drape it with a white or very light colored cloth (sheet, towel, etc) and arrange at least 3 white or light colored objects- one on top, and the others around the box. Shine a directional light source on it so that distinctive light and shadows are created. Remember that in a finished value drawing there shouldn't be contour lines visible, just edges between shapes of value. As with the line drawings, pay attention to shapes, proportions, and spacing of objects.

Value Reduction Drawing- This is a type of drawing done by drawing the light in the set up, rather than the dark. Take a sheet of your 18" x 24" paper, and using a piece of your vine charcoal, fill it with an even dark gray. Then use your kneaded eraser to draw the set up, erasing out the light areas of the objects. (see the student example above) If you erase too much, use the vine charcoal to fill it back in. Try to match the values as closely as possible. Students spent 45 minutes working on this drawing.

Compressed Charcoal Drawing- Turn to a new page in your 18"x 24" pad. Rearrange the objects in your set up. Draw the still life using your compressed charcoal on white paper, as in the above example. (do not fill in the page with the compressed charcoal first) Once again, try to match the values of your set up as closely as possible in the drawing. Compressed charcoal does not erase as easily as vine charcoal, so build the values gradually and don't make anything too dark that you may want to be white or light later. Students spent about an hour working on this drawing.

When the drawings are finished, spray with your spray fixative to preserve your efforts. Spraying outside is strongly recommended. (in class it's required) These are portfolio exercises that should be made up before the 1st half portfolio collection in two weeks.


Friday, October 8, 2010

Basic Drawing- Line Final


The Assignment- Set up a still life of your own. Put a small box on a table and drape with a sheet or towel. Then assemble the following group of objects and arrange on and around the draped box, as in the example above:

a hat
a shoe
a bottle
a book
a small kitchen appliance (blender, coffee pot, etc)
a telephone (cell or landline)

Draw the set up on a full sheet of your 18" x 24" paper using pencil line only. Cross contour is permitted, but no shading. Draw the objects large so it fills the whole page. Pay attention to the shapes of individual objects, spaces between objects, relative size of each object, and the perspective of the whole set up.

This is a graded project and must be made up as soon as possible to receive partial credit.


Friday, October 1, 2010

Basic Drawing- Perspective in Drawing


Today we continued our study of line, focusing on the concept of perspective, a tool used in two dimensional art to depict volume and space, among other things. I did a quick demonstration of one and two point perspective, then we did a few drawing exercises of drawing simple geometric solids from a set up, paying close attention to their relative location to the table, the artist, and each other.

The Assignment - We did two exercises. In each the goal was to draw exactly what was seen, paying attention to the proportions and shapes of the box/can tops and sides, to the positions of the still life elements on the table relative to the tabletop and each other, and the negative space shapes in between.

For the first I arranged several boxes on the table, some by themselves, others stacked in short piles of 2 or 3, the boxes at various angles relative to the table edge. Students were asked to select a view with at least 3 groups of the boxes and draw it in their 18" x 24" pad using the pencil of choice. Students spent about 90 minutes working on the drawing. To make this up, make a similar arrangement of boxes (cereal or cracker boxes laying down flat are a good size- a single box, two boxes stacked, and three boxes stacked) pick a viewpoint, and draw it.

For the second exercise I kept some of the boxes, but also added some cylindrical objects (gallon paint cans, cookie tin, etc). Students were asked to pick a view that had at least two clusters of boxes and two of the cylindrical items to draw. Students spent about 90 minutes on it. An example can be seen above. To make this up, come up with a similar set up (books and soup/vegetable cans should work well), two groups of boxes/books, with a can on one, and an additional can on the table itself, for a total of 5 boxes and/or cans. Draw on your 18" x 24" paper using pencil line only, filling the whole page.

These are portfolio exercises that must be made up by the first half portfolio grading.


Friday, September 24, 2010

Basic Drawing- Gesture/Reductive/Negative Space


Basic Drawing Exercises- Gesture, Reductive, and Negative Space

Today we did a series of portfolio exercises designed to encourage students to think about the subjects being drawn in different ways. All are useful concepts that can be used to improve one's drawings in general and should always be considered while drawing.

The assignments-

Gesture and Reductive- The first thing we did today was an exercise in gestural and reductive drawing. A large potted plant (or a collection of branches) was set up in the middle of the room and students were asked to make a series of line drawings of it, using a progressively smaller number of lines. In doing so, students were required to consider which lines were the most important in describing the plant. To make this up use your pencil to divide your sheet of 18"x 24" paper into 8 equal size boxes. Then find a large plant with long stalks (or collect several long branches from trees or shrubs in a container that holds them upright) to draw from. Using pencil, draw the plant in each box using the following number of lines: 24, 20, 16, 12, 8, 4, 2, 1. Below is a student example from a previous semester.


Since the number of lines you may use for each will be limited, for each drawing show only the most essential lines needed to understand the nature of the plant. Note in each box the number of lines used.

Negative Space- Last week we drew contour lines surrounding shoes, creating positive shapes. In art, the space not contained in a positive shape is called negative space. Since everything in a drawing is either positive or negative, both are equally important in the drawing.


I brought in my old studio chair, and set it up on the center table, and had students draw the all the empty spaces in the chair, anything surrounded by wood. By drawing all the negative spaces and locating them in the proper relative space, the original object is revealed, as in the example below.

To make this up, if you have a chair with a lot of spaces within, you can do the same thing. If not, a complex section of bare branches of a tree or shrub works very well. Draw it large so it fills a whole sheet of your 18" x 24" paper.

Positive and Negative Shapes- The last exercise brought together positive and negative. I set up a several bottles on the central table, and had the students do a line drawing of them. They drew the positive shapes of the bottles, but were encouraged to use the negative shapes between them to help find the exact contours of the bottles, and the relative spacing and position of each. An example is shown below.

You can make this up by setting up a group of six large bottles and drawing them on your 18"x 24" paper.

Homework- Set up a group of 4 similar sized bottles. (all large wine bottles, all mediums sized soda/water bottles, all small perfume bottles, etc) You will do 4 drawings of the set up, one per page in your small sketchbook. The bottles should remain in the same relative positions to each other, but each drawing should have a different viewpoint. So either have the bottles on something that can be rotated, or move yourself around the set up to a different spot for each sketch.


Friday, September 17, 2010

9/17/10 Basic Drawing


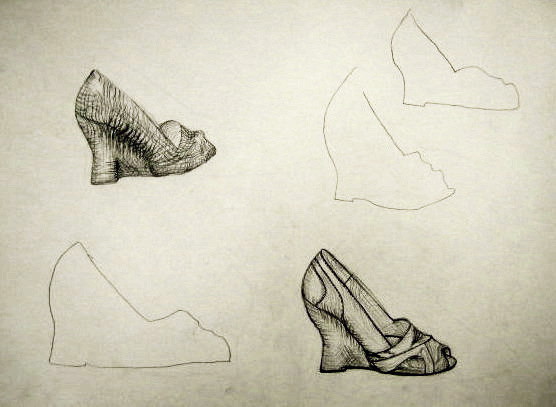
Today's Class- Today we started our study of line. We viewed some slides showing how line has been used in art from prehistoric times to the present. Then the class did some exercises in contour line drawing, with shoes as the subject.

How to make this up- Find a shoe, something with a full upper portion (not a sandal/flip flop). You will do the following drawings from your shoe using pencil line:

Exterior Contour- A single line that surrounds and describes the silhouette of the shoe. No interior structures should be shown. Four examples can be seen in the above photo, and in the bottom left of the photo below. Pay attention to shoe proportions (height to length, relative locations of details) and to the edge. We spent 30 minutes on this exercise, with students drawing between 1 and 6 shoes.

Cross Contour- The artist draws perceived lines that represent the volume of the shoe and movement over its surface. The lines provide clues as to the true 3 dimensional shape of the shoe. Use lines in multiple directions, and they may intersect with each other. There is one example in the above photo, and in the upper left of the photo below. Students spent 30 minutes drawing one shoe in cross contour.

Blind Contour- The shoe is drawn, looking only at the shoe, not at the paper. Let your eye follow a path around the exterior contour of the shoe, paying close attention to details of the edge, moving your pencil to match. See the upper right of the photo below for examples. The slower you draw, the better the result will be. Students spent 15 minutes on this exercise, drawing anywhere from 4 to 12 shoes.

Final Shoe- The last exercise was to draw one fully rendered shoe, including all details of structure and surface. Use cross contour to whatever extent you want. Line only, no shading. An example can be seen in the lower right of the photo below. Students spent 30 minutes drawing the one shoe.

This is a portfolio exercise, which must be made up by the midterm portfolio collection- 10/29/10.

Clockwise from bottom left- exterior
contour, cross contour, blind contour,
fully rendered final shoe


Homework- In your small sketchbook, draw ten line drawings of shoes, one per page. Include the following:

8 pages of exterior contour drawings (just the silhouette)
1 page cross contour drawing
1 page fully rendered shoe

Use whichever pencil(s) you want. Line only, no shading. You may use the same shoe that you did in class, a different shoe, or ten different shoes if you prefer.

For next class 9/24/10- Bring your 18" x 24" drawing pad, pencils, eraser, and sketchbook. I'll provide the subjects for more line related exercises.

Friday, September 10, 2010

9/10/10 Basic Drawing

Today's class- During today's class the syllabus was distributed and reviewed. Students filled out a survey about their artistic experiences and we discussed them as a group.

Homework- None

For next class 9/17/10- Bring your 18"x 24" pad of drawing paper, pencils, and eraser. The subject for next week's exercise will be shoes and you are responsible for bringing one to draw. So either have an extra shoe or be prepared to remove one from your foot.