Wednesday, April 12, 2017
4/12/17 3D Design
Today's Class- Tonight we worked on the next graded project, combining figure sculpture, scale adjustments, and the concept of installation art, along with two new materials for this class. The process began several weeks ago when we cast blocks of plaster and set them aside for the future. I opened with a brief slide show of two late 20th century artists who popularized installation art- George Segal and Edward Keinholz. From a pile of magazines I brought in, students selected a photo of a person and created a scale model of that figure using modeling clay. That clay figure would be used as a model for a plaster figure carved from the cast blocks.
Just as sculptors have been doing for centuries, the modeled clay piece was used to provide a visual reference, aiding in deciding what had to be removed. Using available tools, students started cutting the blocks down to the shapes they will need to be. A little messy, but great progress was made.
How to make this up- Everyone was present, got started, and knows what to do.
Homework- Nothing yet. Work will continue on this project in next week's class, at which time I will decide when the final piece will be due.
For next class 4/19/17- We continue on these installation pieces. Once the plaster figures are carved, you will need to create the environment that will be around them, and that space is considered part of the sculpture. I will have all the same tools, but if there is something else you want to use, bring it in. Also bring in whatever materials you need to work on the installation part of the piece- found objects, glue. etc.
Wednesday, April 5, 2017
4/5/17 3D Design
Today's Class- Tonight was Day 2 of the book project. Everyone continued on those, and the books were finished, critiqued, graded, and returned. It was also the due date for the cast off manufactured materials project, or what I often call the plastic project, so we had a critique of those.
There was a balloon animal dog sitting on the table when I arrived, and while that might technically qualify, tonight's students easily topped that.
How to make this up- Everyone was there and completed the book graded project.
Homework- Nothing new, as everyone seems to be caught up, so enjoy the rest. Two more major projects to go starting next week.
For next class 4/12/17- Our next project is a scaled down figure installation style project. Each student will create a small model in clay, based on a photo of a person. That clay piece will function as a prototype for a plaster figural piece, carved from blocks we cast earlier in the semester. The plaster figure will form the subject of the installation piece- a sculpture in which the environment that surrounds the featured piece is just as much the sculpture as the plaster piece.
Above and below are examples of this same project from a previous semester. The plaster is carved using tools that will be in the classroom, and you have the option of using anything you want to create the rest of the piece's environment.
You will have two weeks in class to work on this project, plus additional time at home if needed. Bring sketchbook and pencil to work out ideas, with additional materials probably not needed until the following week.
Wednesday, March 29, 2017
3/29/17 3D Design
Today's Class- Tonight we began a new graded project, working with a new medium. You are going to be carving a book. A book is a solid three dimensional object that has the ability to be opened and closed, pages looked at in any order and yet can be returned to its original state instantly. Most are made pretty much from tree based products, and so they can be carved. Students were asked to bring in an old book that would not be needed for its original purpose any more, as it will be turned into a sculpture.
How to make this up- Two options were given for this project:
A) Single view sculpture- here the book is opened to a specific point and a three dimensional image is revealed.
B) Changing View sculpture- positive and negative spaces in the book change places, coming and going, so as a viewer turns pages, the sculpture continues to change. Yet it can be returned to the original state at any time. The following student example is geometric, but it can work with organic shapes as well. Through the spaces we can see the shapes of the upcoming sections.
A few basic rules:
The book must be able to open and close as originally designed.
All pieces must remain part of the original structure, bound as created by the publisher.
You may not write or draw on the pages, but you may take advantage of words and images printed by the publisher.
You may use glue to repair torn pages, but not to build three dimensional shapes.
Homework- Carving a book is a lot more difficult than it seems that it should be, so we will continue working on this same project next week. Due date will be determined next week.
The cast off manufactured materials project (plastics, etc) is due at the beginning of class on April 5, 2017. Projects will be critiqued and graded that night.
For next class 4/5/17- We will continue work on the book carving project. Bring with you the book you are working on, and whatever tools you are using.
Wednesday, March 15, 2017
3/15/17 3D Design
Today's Class- Tonight we started the next major project of the semester, a sequel to our stone age natural materials project. This time, the materials are all cast off manufactured materials. Once again the shapes, textures, and colors of the materials will have an influence on the final pieces, though this time the subjects are completely open.
How to make this up- Come up with an idea for a representative sculpture, made from manufactured cast off materials, such as plastics, glass, metals, rubber- anything not found in nature. The materials used can be broken up and manipulated in any way you want, though you may not paint it- all color must come from the materials used. I posted a bunch of examples last week, and here are a few more that I showed in class tonight.
Above, bird pieces from Lisa Bagwell, below, student example from the fall semester.
Pieces may be attached by any means you prefer- nails, screws, staples, and good old hot glue. Hidden structures are acceptable, but all things we see should have some resemblance to the intended subject. I had provided a supply of plastic caps and other packaging materials I had saved, but anything you can find will work. The above pieces and things posted last week should give you ideas about what kinds of things you can work with.
Homework- Next week is spring break, which gives you an extra week to get this done. It will be due at the beginning of class on April 5, 2017.
For next class 3/29/17- We will start our next major project, the book carving project. This will be a multi-week project. You will need a book that you don't mind cutting up (a back up book is a good idea in case you need it), x-acto knife, and extra blades are recommended, as blades will get dull and dull blades tend to tear paper rather than cut it. Before our next meeting I will post examples of different approaches to this assignment so you can think about what you may want to do before class.
Wednesday, March 8, 2017
3/8/17 3D Design
Today's Class- Tonight we continued the idea of making use of the inherent shapes of objects and turning them into art. Unlike last week's natural materials, this time we are working with something that is manufactured, and not for the purpose of making art. The medium tonight was pulp cardboard coffee trays, simple disposable, given out wherever coffee is sold to go, to help move it to the next location. It turns out that these simple throw away times have some very complex surfaces, which like the things we looked at last week, can be adapted to other things. Students had the option of making something familiar or just creating an abstract 3D design, but something about this project seems to make students want to create critters. Below are some examples from tonight's class- a lion and a pig.
How to make this up- Everyone was present tonight and completed this portfolio exercise.
Homework- The natural materials projects begun in class last week are due at the beginning of class on March 15, 2017.
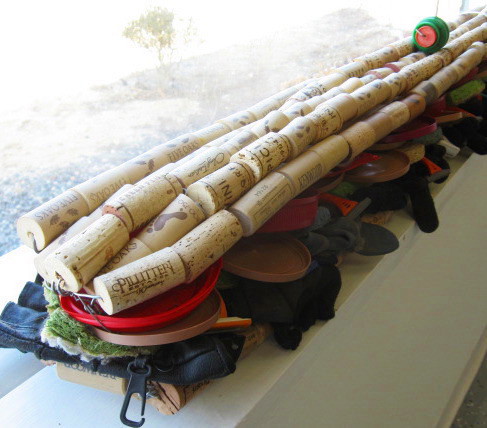
For next class 3/15/17- We will begin our next graded project, a sequel to last week's stone age style project. This time the materials will all have to be cast off manufactured materials. All things that were created for purposes other than art, and disposed of when no longer needed, not unlike tonight's coffee trays. Below are some examples from local artist Lisa Bagwell, who has made this way of working her specialty.
Her "Giant Hoagie" has bread make from wine bottle corks, an olive garnish made from plastic bottle caps, and is filled with plastic cup lids, gloves, disposable razors, and scraps of cloth, yet from a distance very much resembles a tasty sandwich.
Below, bottle caps, small cigar mouthpieces, and care instruction inserts for plants are easily put to work as other things.
And now here are some examples of this project from 3D students of past semesters-
Some rules to keep in mind:
1) Sculptures should resemble something that actually exists, but can be objects or living things.
2) All colors in the finished piece must come from the items used to make them- no painting is allowed.
3) Materials may be manipulated in any way you want.
4) Hot glue is probably the easiest way to put things together, but you can use anything you want to attach stuff- glue, nails, staples, screws, etc.
I will bring in a bunch of cast off plastic that you are welcome to, but feel free to bring in any discarded manufactured materials you want to work with. (things designed to build with are not allowed- like lego bricks, tinker toys, etc)
Wednesday, March 1, 2017
3/1/17 3D Design
Today's Class- Tonight we opened by looking at the positive/negative space projects (skeletons) and having a quick critique. They were graded and returned. Then we moved on to the next project, what I usually refer to as the stone age project. Art made in the days when humans were cave dwellers was made with natural materials- no choice as there wasn't anything else. What we find in looking at this ancient art, is that often the shape and design of the artwork is very much influenced by the material used to make it. For example, a living thing might have its pose twisted to fit the shape of a particular bone or rock it would be carved into. We did a quick exercise where I had the students take several seashells from a supply I brought in, and see if they could make something based on the shapes and textures of the shells. Based on that idea, students were asked to design and build a small sculpture using only natural materials and hot glue, with the subject being human, animal, or a mythological hybrid, the most common subjects of that era.
How to make this up-
The whole class was present tonight, and so everyone was able to start it in class. Students were able to use the shells again, plus anything they had brought in, so lots of rocks, twigs, pine cones, sticks, and other natural materials were put to use. Above and below are student examples from tonight.
Homework- This stone age graded project will be due at the beginning of class on March 15, 2017.
For next class 3/8/17- We will continue this idea of using the inherent shapes of our art materials as and inspiration, and build something from pulp cardboard coffee trays, things generally given away wherever coffee is sold to go. The objects have surprisingly complex surfaces with a variety of concave and convex shapes that reveal themselves with careful observation. Bring two or three of the cardboard trays, something to cut with (knife or scissors), and white glue.
Wednesday, February 22, 2017
2/22/17 3D Design
Today's Class- Today the topic was planes, as in surfaces of 3D art. We looked at some examples of Frank Lloyd Wright houses and Richard Serra sculptures, two artists who used broad planes in their work. Then we moved on to a portfolio exercise on this topic.
Automobiles can be considered our most potent consumer durable good, and probably the most heavily advertised thing as well. They have inspired art for more than a century. Tonight we considered external appearances, and students were asked to build a model of a favorite car, one chosen just because they liked the appearance, and not based on cost, speed, reliability, etc. Instructions were to build it using foam core and bristol board, and each time a piece was cut out to be included in the car, an identical piece was to be cut out and set aside. After your model of the car is completed and assembled, take the second set of pieces and turn the into something else- can be a recognizable object or abstract, anything but a car. Below are some student examples from previous semesters.
And here are examples from tonight's class-
How to make this up- Everyone was present and completed the assignment
Homework- The positive/negative space graded project (skeletons) is due March 1, 2017.
For next class 3/1/17- We will start our next graded project, the stone age art project. Art of that era was made from natural materials, as there was nothing else. Often the shapes of the materials dictated the subject. I will be providing some seashells and pieces of bamboo. You need to bring some natural materials of your choosing, such as natural wood (no plywoods), stones, seeds, etc. Pieces of living plants (such as leaves and flower petals) are permitted, but they will start to wilt almost immediately, so should be added just before it's turned in. You will need glue to attach everything together- hot glue is recommended for this project. And because the cave based artists of long ago somethings painted their creations, you have that option as well. Below are some examples from previous semesters
The subjects should reflect the kinds of subjects used by artists of the cave dwelling era- so humans, animals, mythological human/animal hybrids, all of which can be whole or parts of such things.
Wednesday, February 15, 2017
2/15/17 3D Design
Today's Class- We opened tonight by looking at the completed Make 100 projects. After the critique these were graded and returned to the students before the end of the class. Then we moved on to the second project of the semester, an exploration of the the use of positive and negative space, using relief sculpture and starting with skeletons as the subject.
How to make this up- Everyone was present tonight, so should know what to do. But in case some reminders are needed before it's due, everyone started with a drawn skeleton (human or animal) and reproduced all or part of it as relief sculpture, using foam core as the material. Below is a sample I produced a few years ago to explain the project, first a human skeleton, then a second relief piece that borrows structures, movements, and similar relationships of positive and negative space.
Below are some student examples from previous semesters of this project.
Homework- The completed positive/negative space relief project is due at the beginning of class on 3/1/17.
For next class 2/22/17- We will do a portfolio exercise that addresses the principle of planes, broad surfaces of a sculpture. The starting point will be cars. Bring photos (all sides) of your favorite car based only that car's appearance, not because of any other characteristics. You will construct a model of that car using bristol board and foam core, and then a second piece of three dimensional art that isn't a car. Bring bristol board, scraps of foam core, pencil and eraser, x-acto knife, and glue. You may leave the slime at home.
Wednesday, February 8, 2017
2/8/17 3D Design
Today's Class- Today we discussed the ideas if symmetry and balance as part of composition. I showed art from various points in history, and we decided if each was symmetrical or not. Then we began the new portfolio exercise- starting with simple memory sketches of symmetrical objects, then choosing one to build a three dimensional composition around, with the rule that the final piece would not itself be symmetrical.
How to make this up- Everyone was present tonight so everyone has it done. Here's an example from tonight's class-
Homework- The first graded project- the Make 100 module project- is due at the beginning of class on February 15, 2017.
For next class 2/15/17- After a critique of the first project we will discuss the concept of negative space in sculpture and then start our second graded project. Below are some student examples from previous semesters.
The idea is to start with an image of a skeleton, human or animal, whole or part, and produce it as a relief sculpture, which will emphasize the positive (bones) and negative (space between bones) relationship. After completing that, the second part of the project is to create a second piece that is not a skeleton, but shares some positive and negative relationships with the first one.
Each piece will be created on a 12" x 12" base of foam core, and the positive shapes will also be made from foam core. You may use all white for both parts, or have the option of choosing a color for either the positive or negative shapes. Bring enough foam core to create two 12" x 12" relief pieces (base and raised pieces), x-acto knife, glue, and pencils.
Wednesday, February 1, 2017
2/1/17- 3D Design
Today's Class- Today we had our first real class of the semester. It was a very small class, but we had it. At the beginning of the semester the focus is on principles of design, formal issues, etc. We opened with a classic beginning 3D project, called "Make 100", creating identical modules and building them into a larger piece.
How to make this up- The first step is to create a small three dimensional module using bristol board. The resulting piece should be three dimensional, with at least one side 1.5 inches, but the whole thing no larger than 1.5 inches in any direction. I recommend using sketchbook paper to work out possible ideas, then a prototype in bristol board. The module should be stable, maintaining its shape at all times. It can be made from a single piece that has some folds in it, or from multiple pieces attached to each other.
If you are satisfied with your module concept, you need to make 100 identical copies. I suggest a bristol board pattern, then trace the shape on other pieces of bristol, then cut them out, then glue them together to make the modules. The next part of the project is to take those 100 modules and assemble them into a larger sculpture. They should be glued together into a permanent design. Below are several student examples from previous semesters.
In creating the assembled sculpture, keep in mind that the pieces will be viewed from multiple angles. Account for both positive and negative space. The final piece can be made to resemble a recognizable object, or can be abstract design. Consider all the different ways that you can join them together. You have the option to create a flat base to attach everything to (see top example) or just build something that can be a free standing sculpture.
Homework- The assembled Make 100 module project is due at the beginning of class on February 15, 2017.
For next class 2/8/17- More formal issues and bristol board. You will need a stiff material for a base, such as foam core or mat board, about 8"x10". You will also need a sketchbook and pencil, scissors, and white glue. We will be doing a portfolio exercise with a focus on balance and symmetry.
Subscribe to:
Posts (Atom)