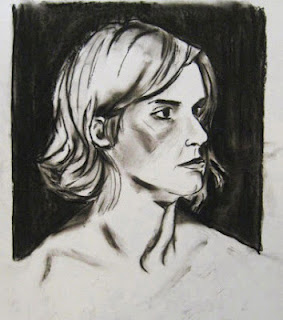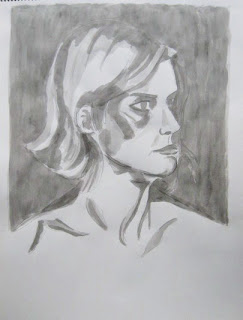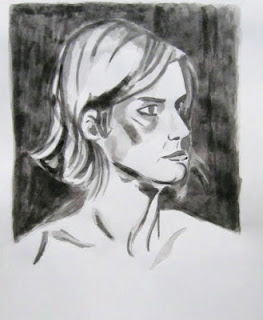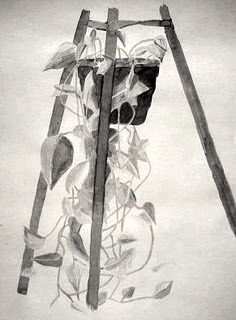
Ink wash is drawing ink that has been diluted with water to create varying strengths of value and is applied with a brush. It can be done with any color of ink, but for our class we are using black. Because ink can't be erased, I suggest that students build values gradually, from barely visible washes to full strength ink if needed. To show how the process works, I started with a subject, the completed charcoal sketch above, and took the drawing through a few stages.
Start with at least two containers, one for clean water and one for your wash, which should just be a few drops of ink in a little water. Test on a scrap, and adjust the mix as necessary. If you wish, sketch your composition out first with light pencil.
1st State- A very light wash has been applied to the paper everywhere that isn't going to be left white. A few spots got a little extra, but most of the page is one of two values. Even at this stage, light and shadow give some three dimensional modeling to our subject.
 2nd State- A darker wash (more ink added to the wash container) has been put over parts of the drawing. Facial features and hair are more defined, and the overall value range has been pushed further, increasing the three dimensional effect. The background separates more from the subject.
 3rd State- A stronger wash is used selectively on the subject to deepen a few key shadows and for local values (eyes/eyebrows). The value range has been extended to at least four values (white page and 3 levels of gray), which makes the modeling seem more gradual even as the range becomes more extreme. The background is darker still, which balances against some of the darker areas of the face and hair and helps push the head and figure more forward.
The above drawing could probably go at least two states darker in some parts, if the goal is to match the original charcoal.
Keep in mind-
*Ink can't be erased. While it is still wet you might be able to blot up some wash with a clean paper towel, but once it's in the paper, it's there for good.
*Ink wash will be significantly lighter when it dries. Between states, give it a few minutes to fully dry and see how dark the drawing truly is. Hanging the single page loosely over the edge of your desk, so air can hit it from both sides, will speed the process.
*When you add ink of any strength to an area that is already very wet, the ink will usually spread into the whole wet area. If you wish to add a little detail to a previously drawn area, let it dry first, and then the ink will only go where your brush directs it.
*Ink can be used full strength if the image calls for solid black areas of value.
*A range of brush sizes can be helpful. The above example was done with a single medium-small round watercolor brush, but large brushes can be helpful for filling large areas more quickly, and smaller brushes for putting in tiny details.
 Today's Class- Today was our last class meeting of the semester. I returned the first part of the take home final exam (cumulative western art), along with the graded current arts events journals and any extra credit assignments. Then the class took the second part of the final (non-western cultures). Once the test was turned in, students could leave.


